Maintaining a properly functioning toilet is necessary for any household, and one of the common issues that homeowners encounter is a failing flush valve. When you notice continuous water running into the toilet bowl or the flapper failing to create a tight seal, it’s likely time to replace the flush valve.
At the same time, this may seem like an overwhelming task, but with the right tools and guidance, replacing a toilet flush valve is a manageable DIY project for the average homeowner. In this comprehensive guide, we’ll walk you through each step of the process, guaranteeing a successful and hassle-free replacement.
Understanding the Flush Valve:
The flush valve is a vital component of a gravity-flush toilet, responsible for controlling the flow of water into the bowl to initiate the flushing action. It consists of a large plastic or metal assembly located inside the toilet tank, typically near the center. The valve unit comprises an overflow tube attached to a valve seat, which fits into the opening at the bottom of the tank and a flapper that seals the opening until a flush is initiated.
Signs that a flush valve needs replacement include continuous water running into the toilet bowl, even after addressing issues with the flapper, and the flapper failing to create a tight seal due to a worn or cracked valve seat.
Preparation:
Before beginning the replacement process, gather the necessary tools and materials:
Tools:
- Channel-lock pliers
- Adjustable wrench
- Large standard screwdriver
- Hacksaw blade (if necessary)
Materials:
- Replacement flush valve
- Two toilet tank bolts
- Water supply tube (if necessary)
Additionally, ensure that you choose a flush valve that fits your specific toilet model. Taking the old flush valve to the hardware store for comparison is recommended to ensure proper sizing. Seek advice from the hardware store clerk to select the best flush valve for your toilet. You can click here https://www.plumbersingapore.org/toilet-flush-installation/ to learn more.
Step-by-Step Replacement Process:
1. Shut Off the Water:
- Locate the fixture shutoff valve near the bottom left side of the toilet tank and turn it clockwise to shut off the water supply. If there’s no fixture shutoff valve, use the main shutoff valve for the house.
- Flush the toilet to drain the remaining water in the tank, and use a sponge to remove any excess water.
2. Disconnect the Water Supply:
- Using channel-lock pliers or an adjustable wrench, disconnect the water supply tube from the tailpiece on the toilet fill valve.
3. Remove the Toilet Tank:
- The toilet tank is secured to the bowl with tank bolts. Unscrew the nuts threaded onto the tank bolts inside the tank. You may need to hold the bolt in place with a screwdriver from inside the tank to prevent it from spinning.
- If the nuts are corroded and won’t come off, use a hacksaw blade to cut the bolts between the tank and the bowl.
4. Remove the Tank Bolts:
- After removing the nuts, carefully lift the tank off the bowl and set it aside on a stable surface.
- If necessary, remove the second set of nuts holding the tank bolts onto the toilet tank. In some cases, you may need to cut them off with a hacksaw.
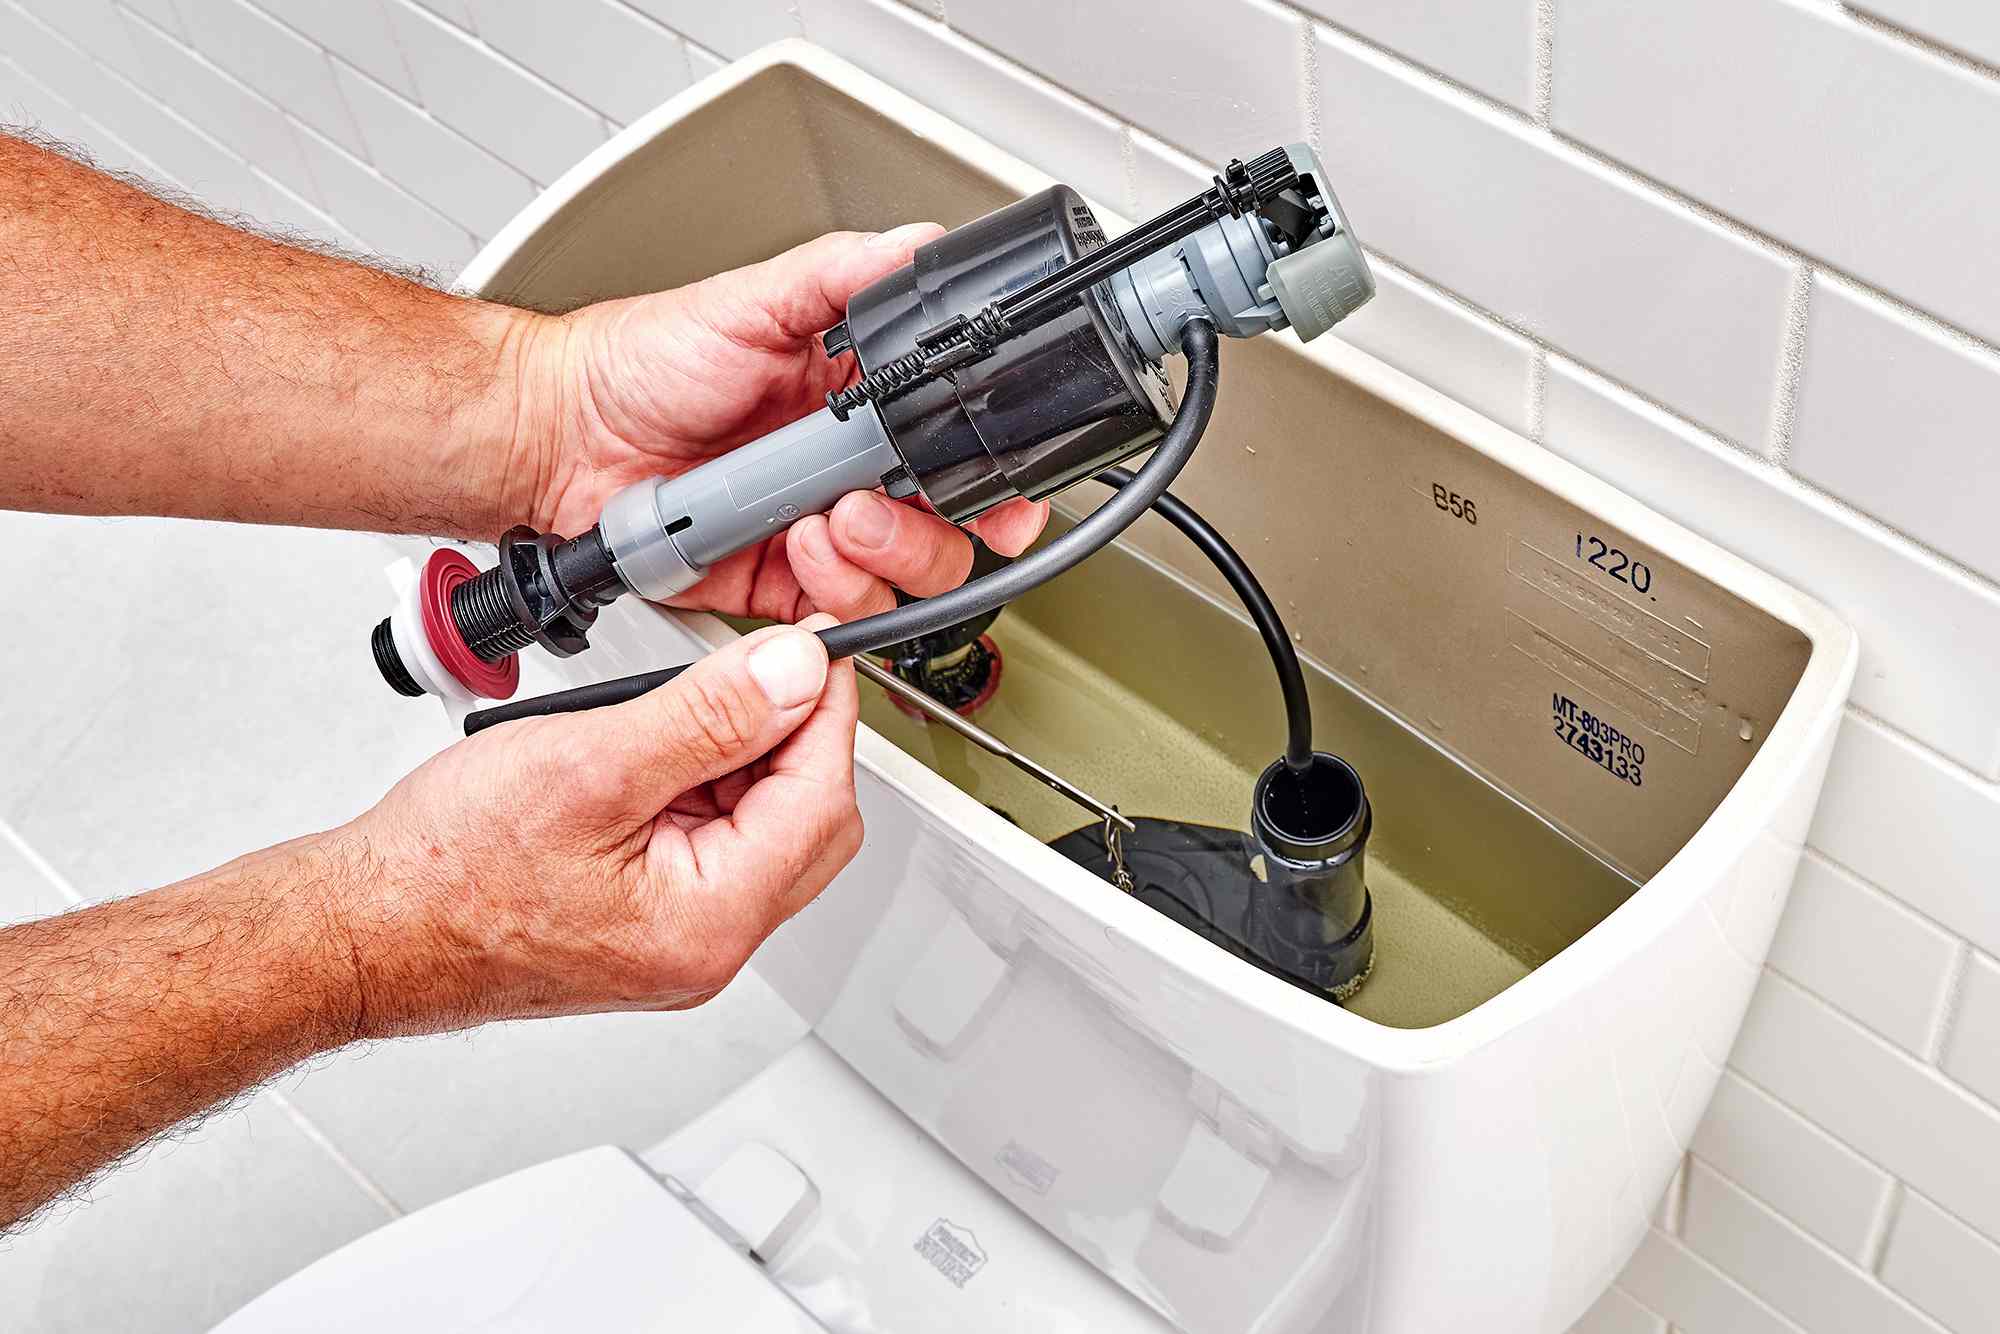
5. Remove the Old Flush Valve:
- Remove the large foam gasket covering the plastic mounting nut on the tailpiece of the flush valve.
- Use channel-lock pliers to unscrew the mounting nut and pull the flush valve out of the tank.
- Clean the inside of the toilet tank before installing the new hardware.
6. Install the New Flush Valve:
- Slide the large beveled washer onto the tailpiece of the new flush valve, ensuring the beveled side faces down.
- Insert the flush valve through the opening in the toilet tank from the inside, following the manufacturer’s instructions for orientation.
- Thread the mounting nut onto the flush valve tailpiece from the outside of the tank and tighten it with channel-lock pliers. Be careful not to over-tighten, as it may break.
7. Set the Tank Bolts and Tank onto the Bowl:
- Thread the tank bolts through the holes in the bottom of the toilet tank with rubber washers under the heads of the bolts.
- Set the tank onto the bowl, ensuring the bolts slide down through the holes in the top of the bowl.
- Thread metal washers and nuts onto the bolts from the outside of the tank and tighten them by hand.
8. Connect the Water Supply and Check for Leaks:
- Reattach the water supply tube to the toilet fill valve and turn on the water supply.
- Connect the flapper chain to the toilet handle rod from inside the tank.
- Adjust the flush valve height as needed and check for leaks by flushing the toilet several times. Tighten any connections that are leaking.
When to Seek Professional Help:
While replacing a toilet flush valve is a manageable DIY project, there are instances where it’s best to call a professional plumber like https://www.plumbersingapore.org/. If you’re uncomfortable with the process or encounter difficulties such as badly corroded bolts, seeking professional assistance ensures the job is done safely and efficiently.